Saturday, August 4, 2012

Feature # 4 - CORN CORN CORN

Remember when I was giving my little spiel about Fort Ancient culture?  I mentioned that they were largely a maize-based agricultural society, and you can definitely tell that from one of the features we excavated.  In this trench, we found about 9 or 10 different features, all containing different types of artifacts and organic materials.
I'm in the first feature, which was a lovely trash pit (midden, remember?).  The girl in the purple off to the right - you see her?  That is only a half of a feature that we decided to poke around in to see what it contained.  Little did we know that we were uncovering a gold mine of burnt corn.  Usually, we collect pieces of charcoal to use for dating.  However, this small feature was filled to the brim with pieces of corn.  When we find organic remains like this, we usually put them in a film vile because they seldom come in bulk.  With this unit, we needed BOXES to put all the corn in.  It was like corn with a side of dirt.  Anyway, sorry to rant - it was just extremely surprising to come across that much corn in one small feature.  What was nice about this collection of corn was that it was near the earth oven in the middle of the trench.  When we look at corn cooked by Fort Ancient Indians, we get a nice glimpse into how agriculture has transitioned over time from something small and without extensive techniques or fertilizers into overgrown feed for farm animals and a key ingredient in most foods.  
Here, you can see the size of corn centuries back as opposed to what we find in the fields of the Midwest today.  What I like about finding organic materials like this is that we are able to get a closer look at diet apart from mussels and forest animals.  In the feature, we also find other remains like shells of nuts and seeds, indicating at least some sort of variety in diet.  We get a first-hand feel for what life was like for these natives and relate to our experiences today.  We wonder how, like us, they may have experienced drought or poor soil or perhaps the opposite and feasted on their version of "gold."  Finding organic specimens like this is exciting for me because it allows us to have a different view of native life apart from the material objects like pottery and projectile points to appreciate and understand about past ways of life. 

Friday, August 3, 2012

Feature # 3 - Burials

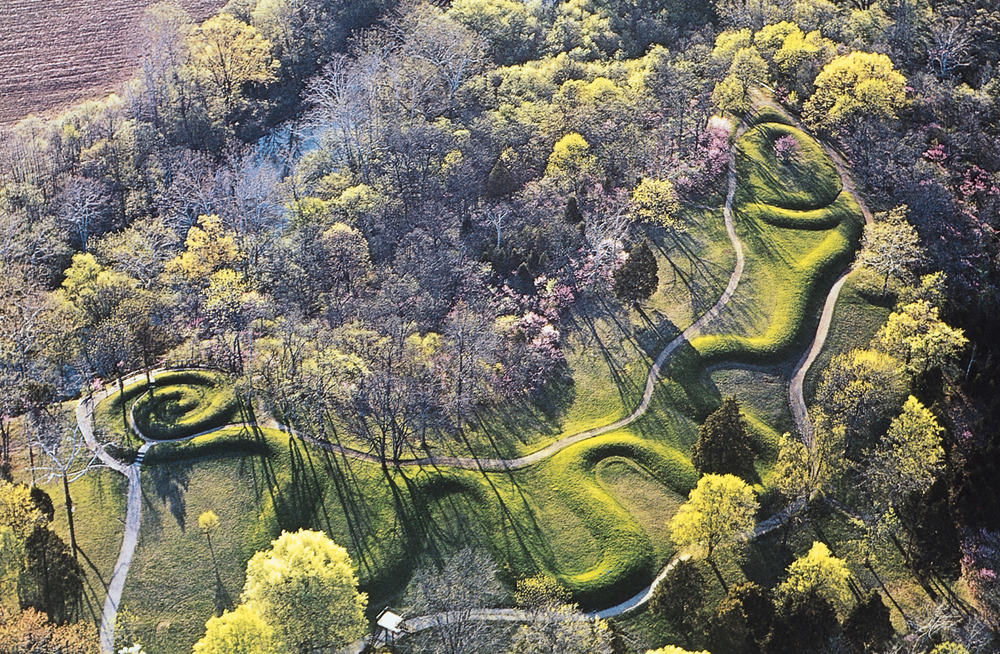
There is a large issue with burials when excavating in North America, as I have mentioned before in previous posts.  While Ohio is known for its burial mounds (predominantly Serpent Mound, as depicted below), there are still a lot of politics behind the excavation of a native burial.
Many natives feel the right to claim the remains of a loved one, not allowing museum excavators to touch or collect any sort of artifacts or skeletal remains found in a burial.  Much paperwork and legal negotiations need to be made, more complicated than I can even explain in a blog post.  So, for the sake of sanity, I will leave it at that.  At the site, we have run into human burials, which we could tell were human by the skeletal remains (they are distinctively different than animals remains, obviously).  This encounter was largely unintentional, since we only using sensing devices to read disturbances in the soil.  This means that we cannot tell what we are excavating beforehand, just that we will be excavating some sort of feature.  So, when we do encounter a human burial, we leave it alone, fill up the feature, and move on.  We have excavated a few dog burials, though, demonstrating the connective canine companionship associated with domestication.  Even though dogs were also used as a source of food, these burials suggest that the term "man's best friend" still applies.  The way we could tell that these features were dog burials was that the remains of the dogs were lain in a certain intentional stance rather than just thrown and scattered about.  Also, we found some sherds of pottery with traces of some sort of food or organic materials around the dog remains, suggesting that these pots were ritualistic instead of just trash.  I found this feature fascinating because though we were not able to excavate the human remains, we were able to see at least some sort of ritualistic elements involved in burials in a small scale, making me wonder to what extend human burials were elaborate.  It is amazing to see how so many things may interconnect and point out information for other fascinating topics.

Thursday, August 2, 2012

Feature #2 - Midden

A common feature we run into at the Hahn site is a midden.  This feature has multiple purposes, but a majority of the time it is largely a trash pit for domestic and "kitchen" waste or even a hole for a latrine.  The way that we can tell the difference between the two is that a trash pit, obviously, has "trash" in it (which we archaeologists see as treasures) and the latrine usually has nothing in it at all.  Here, we have a trash pit:

As described in the previous post, we are able to tell this is a distinctive feature because it has different coloration and texture than the surrounding soil.  In this picture above, we can see that the concentration of shells and bones as well as the dark color make it distinctive as a feature.  What makes the feature as a trash pit is that it demonstrates that the objects in the pit were once utilized (i.e. the mussel shells had been cracked open and the bones had cut marks or were burnt for cooking).  In order to excavate this feature, we divide the pit into halves, then excavate one half at 10 cm intervals and pay attention to any change in the soil along the way.  We know we reach its bottom when we encounter gravel and sand, which show natural features rather than man-made features.  After we map the first half, we can then excavate the second half according to horizons, not necessarily by 10 cms.  Each horizon is that distinction between layers of soil in the pit, whether it is the layer of artifacts of the way in which the soil is colored.  What is beneficial from excavating in trash pits it that we are able to uncover artifacts like broken sherds of pottery to see various styles attempted and used by Fort Ancient Indians.  We can also see broken flakes of flint or utilized tools that had been used to their capacity and then discarded.  I find it extremely fascinating and exciting to be able to reach into the past and see what these Native Americans were thinking and doing and eating and creating each day as well as see how we can compare our behavior today to theirs in the past.
Finally, we have our latrine.  The way we know that is was a latrine was that there was barely anything in the sediment when we put it through the screens.  The pit looked like a feature due to its change in color and texture, but because it had close to nothing in it, save for an occasional pebble or piece of flint, we knew it was a latrine.  So, like the midden, we separated the pit into two halves and dug by 10 cm levels, but after we realized there was nothing in it, we then excavated the whole thing all at once.  Though I feel like this is a flawed way of excavating, it was still effective because we did not damage any artifacts and were able to get through the dirt more effectively.  From these experiences, we are able to learn various techniques needed in archaeology but also allow ourselves to judge what we think is more correct and proper methodology in excavation.  

Wednesday, August 1, 2012

Feature #1 - Earth Oven

When digging in the units we create, we find many different types of features in the soil.  We can see this from the way the texture or the color of the soil is different from the surrounding soil.  Much of the features we find are usually very circular because we encounter trash pits (yes, we get to fiddle around with centuries-old dirt, which I will create a different post about), post holes for houses which seldom have anything in them, and earth ovens.  We are able to tell that the feature is an earth oven because there is burnt clay that is orange in color, which make the walls of the oven.  Charcoal fills a majority of the pit, and at the bottom are river rocks from the river the Fort Ancient Indians used for flint-knapping as well as for lining the bottom of the earth oven for placing coals and timber over in order to cook.  We found a huge chunk of wood at the bottom of the pit this year, which is a wonderful organic element we can use to analyze more about past environments and ways of manipulating the earth for purposes like cooking.  When we find earth ovens, we are able to find a lot of charcoal that we save and use for dating.  This is crucial for obvious reasons since we want to get the dates correct and even the specific time period during which these ovens were in use.  It is also very neat for us because we get to see how deep in the ground we have to get to before finding the feature (which allows us to see how high/low the ground used to be centuries ago) and it also allows us to see the usefulness of more ancient tools when digging into the cement-hard ground.  And let me tell you - this ground was like concrete for the first 2 and a half weeks. It was near  impossible to get through the sediment quickly, so if these Native Americans were able to dig more efficiently than us, well then I applaud them.

Tuesday, July 31, 2012

Troweling Techniques

As an aspiring archaeologist, I feel that it is important to describe the various troweling and shoveling techniques that are needed in the excavation process.  Here is a trowel:
This is one of your most important excavation instruments.  Obviously, you hold it from the wooden handle, but you want to make sure you have a good, firm grip as you are using this devise to chop and scrap and basically wrestle your way through the dirt.  You will be developing impressive hand muscles as a result, and you will get the most annoying blisters when first learning how to trowel.  I place my hand on the edge of the wooden handle as close to, even touching, the beginning of the metal portion of the trowel.  Different ways of placing your hand and fingers allow you to apply a certain amount of pressure depending on the feature and texture of the soil.  For a scrape, you want your hand and the blade to be parallel to the ground and pull the trowel towards you.  Keep a firm grip, or else your trowel will "chatter" and make little lines instead of a smooth groove along the soil, and we archaeologists are all about perfection.  Place more pressure towards the point of the trowel to cover a smaller area and allow for your tool to cut through tougher spots in the sediment.  When the soil is too hard (for us, the dirt was like concrete and almost impossible to excavate through!) there are water sprayers you can use to cover the soil with a thin layer of water.  This does not turn the water into mud but instead spares you at least a year from undergoing early arthritis.  Your trowel will become precious to you over time, so do what you can to prevent it from rusting and make sure you sharpen it to make life easier.
When the trowel isn't going deep enough for us, then we turn to drastic sources.  

A shovel will be your best friend when busting through sod and the plow zone (which is one of the first layers we encounter in excavating - it is the sediment that has been churned from years of human activity and movement of the earth and has a combination of elements out of context from the next level.  Context is important!!).  We do not use a shovel, however, for going through each layer like a trowel, where you have a close-up view of each feature and each story of history told in the soil when on your knees.  Instead, a shovel makes you thankful you do not have to use your tiny trowel to get through the heavy and hard layer of grass and plow zone.  It also lets you make straighter walls for your unit as you cut through the sod and get to the beautiful layer of sediment below.  And when you are frustrated with the dirt, you can always use a trenching shovel to make a combination of a shovel and a trowel!
And, of course, when all else fails and we feel lazy, archaeologists can rely on the beauty of technological advancement to break through the sod more effectively than a shovel and fill up the dirt in our units faster than multiple crews with shovels combined.

God bless technology.  

Wednesday, July 25, 2012

Background on Fort Ancient

I think it's time I gave a little more information about the Native Americans whose site I've been working on, especially since I keep making references to all these time periods and artifacts found that may not seem to make much sense out of context.  I already gave some information about the Fort Ancient Indians (and yes, that is what all the archaeologists call them, since I suppose they're a little too lazy to say "Native Americans" or prefer to stick to traditional terms), especially time period (1300-1500 CE) and at least one location where they're found, which is located at the park we excavate in.  Fort Ancient Indians thrived more realistically in the Ohio and Kentucky valleys closer to 1000-1650 CE.  Their villages were usually in the circular shape as seen in the site with rectangular houses (which we saw when excavating post holes) and a central plaza for more public and shared activities, indicating a more sedentary lifestyle.  There has been some burial mounds by the Fort Ancient Indians, but that dwindled as time went on and they shifted their burials to a more cemetery setting.  Fun fact: last year, we accidentally uncovered a feature that we thought was a typical trash pit or the like, but discovered that it was actually an area full of burials, which would be a highly political ordeal if we totally uncovered those features due to protective laws over Native American burials.  Through the Cincinnati Museum Center, we tend to leave those alone in order to deal with less paperwork and being greeted with upset natives.  Much of the agriculture was maize-based, which we could see from all of the burnt corn kernels and corn cobs we find in the dirt when excavating.  Fort Ancient Indians were once thought to be a branch of Mississippian cultures, which could be supported with some evidence of Mississippian pottery sherds found in features on occasion, but the overall style of pottery and flint-knapping indicate a more direct connection with Hopewell cultures.  The pottery is recognized as Fort Ancient (especially during the Madisonville period) by being cordmarked along the rim and the neck of each vessel.  Each projectile point has a "Hahn hump" in the middle of the flint that makes it distinctive as a Fort Ancient knapped flint, though the reason for the hump has yet to be explained.  The predominant time period of focus is the Madisonville period, which is the latest time frame which, like the earlier time periods, did not indicate interactions with Europeans, but did point to a high point in culture and activity.  Hopefully with this information you will be able to gain a better feel for the context from which we extract the story of the Fort Ancient Indians out of the ground layer by layer.

Sunday, July 22, 2012

Important Archaeological Facts and Terms to Know


In my times in the field, in the lab, and in the classroom, there are specific terms that we as archaeologists use that we INSIST on using.  When we hear any mispronunciations or read any intentional or unintentional spelling or technical errors, we feel the need to twitch and potentially foam at the mouth.  We also have a wave of entitlement wash over us, and we feel the need to correct and belittle you in every possible way.  For example, when you see broken pieces of ceramic, it is called a pottery SHERD, but SHARD.  
Piece of pottery strap handle SHERD
That is one of the most directly important distinctions that must be made, and if you fail to appease us, then you will get attacked without mercy.  Now that that has been settled, let’s move on to other terminology.  The area that we excavate at is called the site (in paleontology, it’s called a locality).  Broken pieces of flint are called flakes or chert, which can cut you really deep when you are working on the screens and are not wearing gloves, so caution!  Flint that has been worked on both sides is called a biface, and not all bifaces are arrowheads; there is a variety of bifaces such as projectile points, spearheads, scrapers, and drills.  
Flint scraper (one of my favorite finds)
We find a lot of bone that gets worked on (which you can tell from cut marks and reshaping and polishing).  Some deer antlers are tapered and pointed to be turned into an awl for both sewing and making holes in leather that has been scraped by a bone beamer (usually a humerus broken in half).  
Bone pin - another favorite find
The units we excavate in are typically 2x2 meters in size, as I said in a previous post, and the most important things to know about units are that you must keep everything level, map the features, and keep your walls straight.  Believe me, it sounds easy, but it is an art everyone has difficulty perfecting. 
As you can see, units can get bumpy from all the bones and features etc.
And last, but not least, we archaeologists get really excited about rocks, because archaeologists are the people that study rocks, right?  Wrong.  That’s geologists.  And when we find a silly or unusually-shaped rocks that individuals think are of some importance, then we call those AFR, or “Another F***ing Rock.”   Hopefully you have been enlightened with this information and I will spare you from the attack of skilled archaeologists looking for fresh meat to torture in the field.